> ## Documentation Index
> Fetch the complete documentation index at: https://docs.opensesame.dev/llms.txt
> Use this file to discover all available pages before exploring further.
# Embedding Your Cell
> Embed your agent via a single script tag
Once your Cell is built and tested, you can embed it directly into your product using the configuration tools provided. OpenSesame supports both **Automatic** and **Manual Configuration** modes, along with three framework options: **HTML**, **Next.js**, and **React Native**.
> **Important:**\
> The variables `{userId}` and `{authToken}` shown in the examples below are **runtime values**. Your app must dynamically replace them before loading the Cell.
>
> * `userId` identifies the active user session.
> * `authToken` must be valid and refreshed as needed to prevent authentication errors during use.
### Automatic Configuration Snippet
### 1. Automatic Configuration
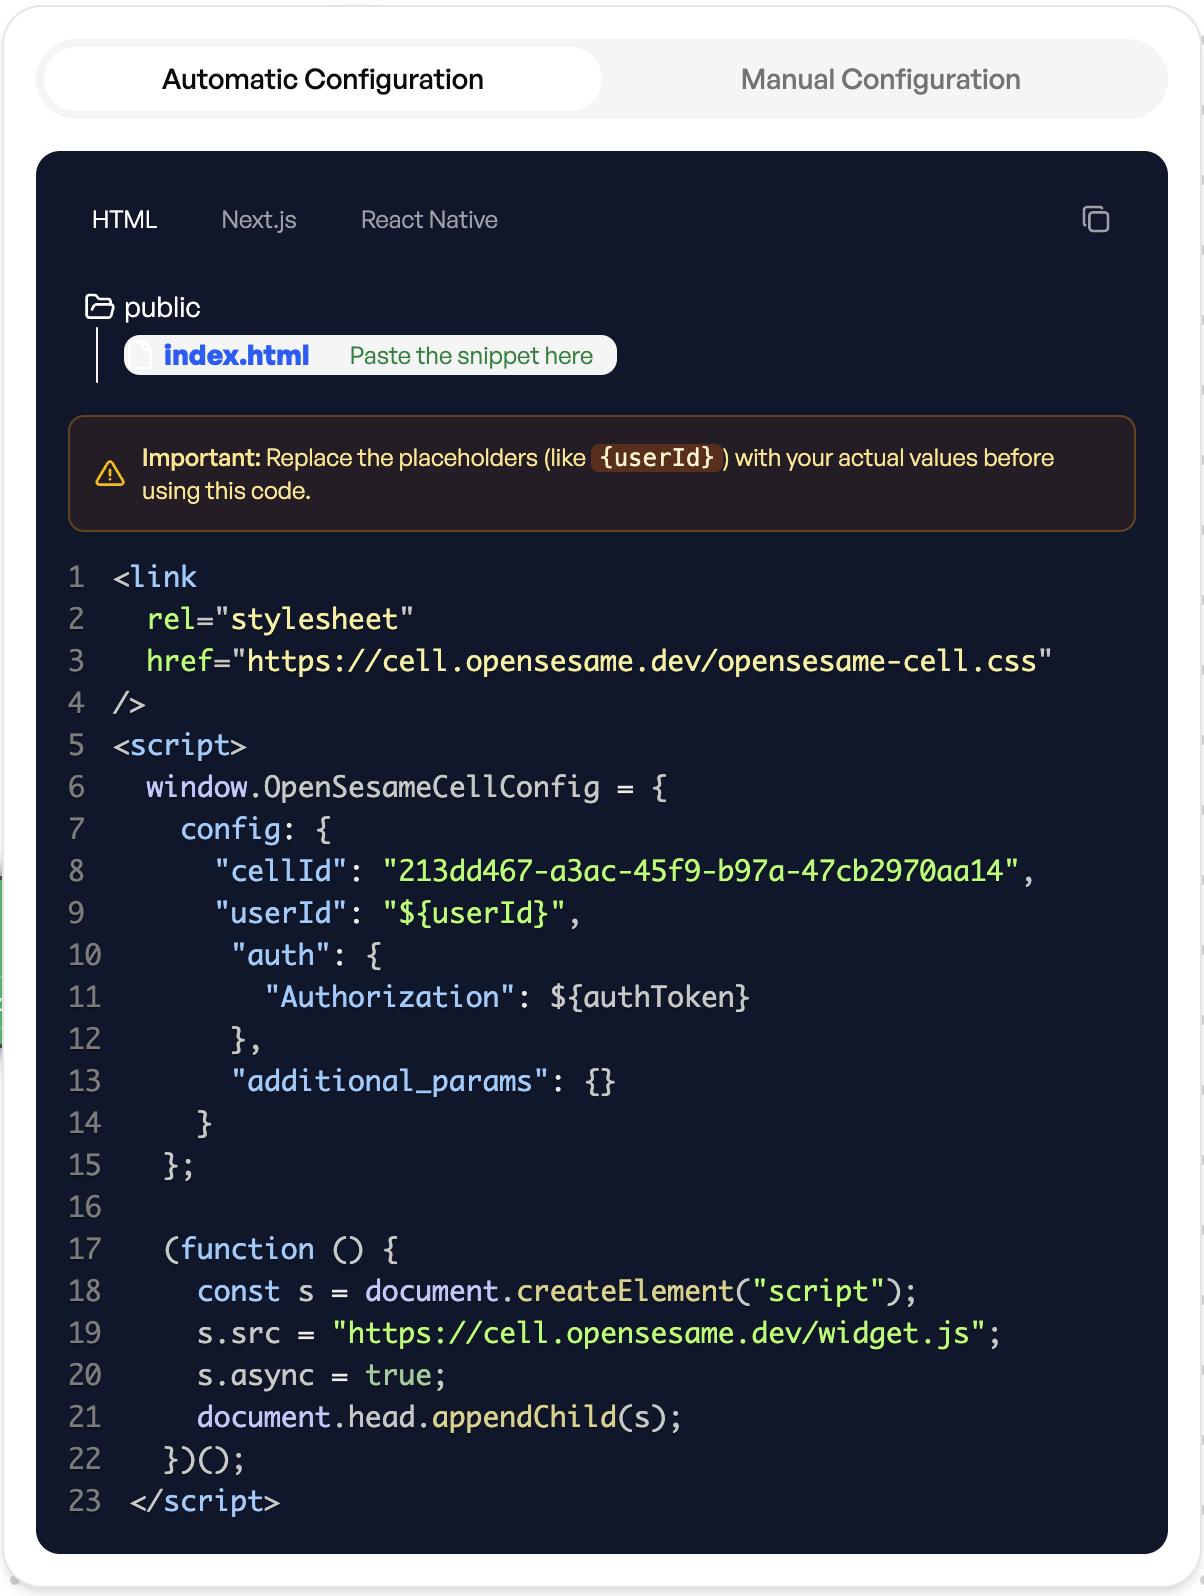
Automatic configuration provides a pre-generated code snippet that includes your **Cell ID**, placeholders for **user data**, and an **auth token**.
**Steps:**
1. Select **Automatic Configuration**.
2. Choose your preferred framework (**HTML**, **Next.js**, or **React Native**).
3. Copy the provided code and paste it into your application file (for example, `index.html`).
4. Replace placeholders such as `{userId}` and `{authToken}` with live values from your app before deployment.
**Example:**
```
```
> **Note:**\
> Make sure that the `authToken` you pass is valid and accessible at runtime. If your app uses expiring tokens (for example, short-lived JWTs), refresh them dynamically before initializing the Cell.
This method is the fastest way to get a Cell running. Once embedded, your Cell appears at the bottom of your interface and can be used by your users immediately.
### Manual Configuration Snippet
### 2. Manual Configuration
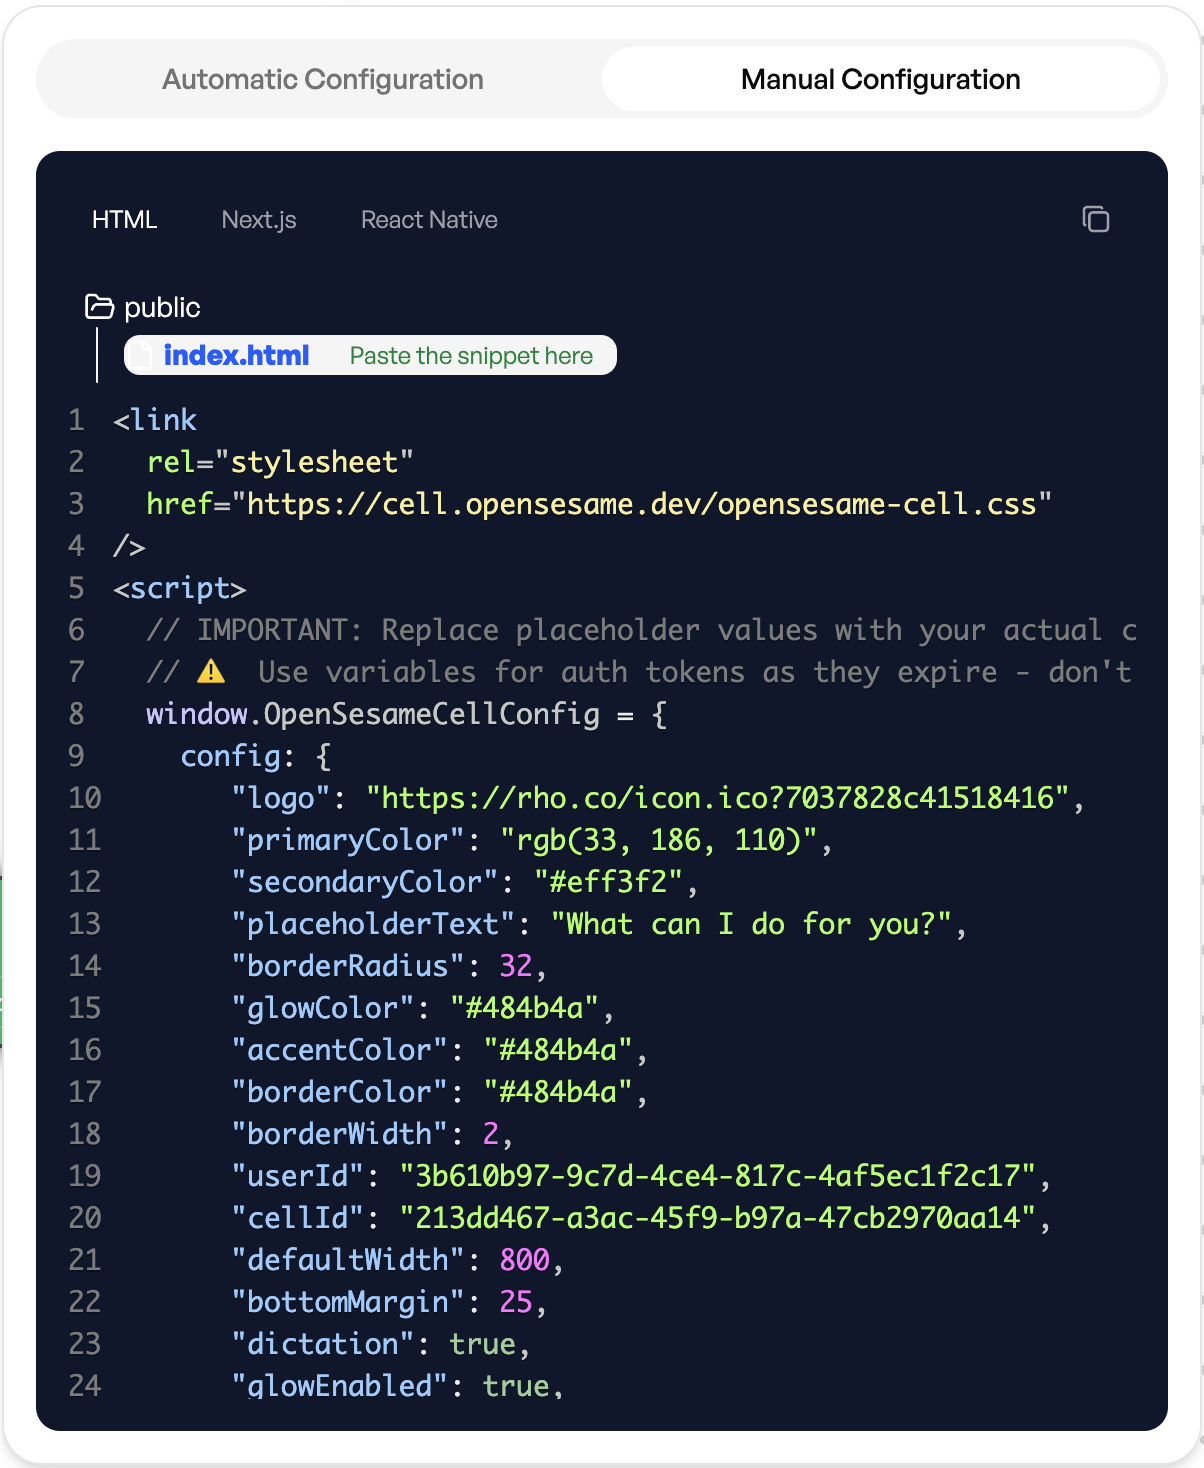
Manual configuration allows you to fine-tune how your Cell looks and behaves. You can adjust colour themes, layout, and size directly in the configuration object.
You can edit fields such as:
* `primaryColor`, `secondaryColor`, and `accentColor`
* `placeholderText` (for example “What can I do for you?”)
* `borderRadius`, `defaultWidth`, and `bottomMargin`
* `dictation`, `glowEnabled`, and `borderEnabled`
This gives you full control over the appearance and placement of your Cell within your application.
### 3. Additional Parameters — Simple Guide
#### What It Is
**Additional Parameters** let you automatically include required values—like customer IDs, company IDs, or region codes—in every API call your Cell makes. This ensures your Cell always operates in the correct data context without the user having to specify those details.
#### How It Works
You can define key-value pairs in the configuration UI or directly within your configuration object (for example, `customer_id: 12345`). These parameters are then automatically appended to all API calls your Cell makes to connected services.
#### Example
* **Without additional parameters:**\
The user must say, “Show me invoices for customer 12345.”
* **With additional parameters:**\
You define `customer_id: 12345` in your configuration. Now the user can simply say, “Show me my invoices,” and the Cell automatically includes the correct ID.
This approach is especially useful for maintaining the correct `userId`, `accountId`, or `companyId` context across all API interactions.
> **Note:** Additional Parameters are optional but recommended if your Cell connects to multi-tenant or user-specific APIs. It helps prevent context mismatches and reduces the need for repetitive user input.
***
### 4. Deployment
Once configured, save and redeploy your application. The Cell loads automatically wherever you include the snippet. You can test the integration in **Preview Mode** to confirm that your Cell connects correctly and displays as expected.
#### Authentication Token
When embedding your Cell, ensure your **auth token (**`authToken`**) is valid and refreshed** at runtime. The embed script uses this token to authorize all Cell requests.
If your tokens expire (for example, short-lived JWTs), refresh them dynamically before initializing or reloading the Cell to avoid authentication failures.
**Example:**
```
"auth": {
"Authorization": ${authToken}
}
```
> **Tip:** If your application renews tokens automatically, reinitialize the `OpenSesameCellConfig` object or reload the widget after the new token is issued.
Your Cell is now live and fully embedded into your product. Once deployed, your users can interact with it immediately.
***
 ### 1. Automatic Configuration
Automatic configuration provides a pre-generated code snippet that includes your **Cell ID**, placeholders for **user data**, and an **auth token**.
**Steps:**
1. Select **Automatic Configuration**.
2. Choose your preferred framework (**HTML**, **Next.js**, or **React Native**).
3. Copy the provided code and paste it into your application file (for example, `index.html`).
4. Replace placeholders such as `{userId}` and `{authToken}` with live values from your app before deployment.
**Example:**
```
```
> **Note:**\
> Make sure that the `authToken` you pass is valid and accessible at runtime. If your app uses expiring tokens (for example, short-lived JWTs), refresh them dynamically before initializing the Cell.
This method is the fastest way to get a Cell running. Once embedded, your Cell appears at the bottom of your interface and can be used by your users immediately.
### Manual Configuration Snippet
### 1. Automatic Configuration
Automatic configuration provides a pre-generated code snippet that includes your **Cell ID**, placeholders for **user data**, and an **auth token**.
**Steps:**
1. Select **Automatic Configuration**.
2. Choose your preferred framework (**HTML**, **Next.js**, or **React Native**).
3. Copy the provided code and paste it into your application file (for example, `index.html`).
4. Replace placeholders such as `{userId}` and `{authToken}` with live values from your app before deployment.
**Example:**
```
```
> **Note:**\
> Make sure that the `authToken` you pass is valid and accessible at runtime. If your app uses expiring tokens (for example, short-lived JWTs), refresh them dynamically before initializing the Cell.
This method is the fastest way to get a Cell running. Once embedded, your Cell appears at the bottom of your interface and can be used by your users immediately.
### Manual Configuration Snippet
 ### 2. Manual Configuration
Manual configuration allows you to fine-tune how your Cell looks and behaves. You can adjust colour themes, layout, and size directly in the configuration object.
You can edit fields such as:
* `primaryColor`, `secondaryColor`, and `accentColor`
* `placeholderText` (for example “What can I do for you?”)
* `borderRadius`, `defaultWidth`, and `bottomMargin`
* `dictation`, `glowEnabled`, and `borderEnabled`
This gives you full control over the appearance and placement of your Cell within your application.
### 3. Additional Parameters — Simple Guide
#### What It Is
**Additional Parameters** let you automatically include required values—like customer IDs, company IDs, or region codes—in every API call your Cell makes. This ensures your Cell always operates in the correct data context without the user having to specify those details.
#### How It Works
You can define key-value pairs in the configuration UI or directly within your configuration object (for example, `customer_id: 12345`). These parameters are then automatically appended to all API calls your Cell makes to connected services.
#### Example
* **Without additional parameters:**\
The user must say, “Show me invoices for customer 12345.”
* **With additional parameters:**\
You define `customer_id: 12345` in your configuration. Now the user can simply say, “Show me my invoices,” and the Cell automatically includes the correct ID.
This approach is especially useful for maintaining the correct `userId`, `accountId`, or `companyId` context across all API interactions.
> **Note:** Additional Parameters are optional but recommended if your Cell connects to multi-tenant or user-specific APIs. It helps prevent context mismatches and reduces the need for repetitive user input.
***
### 4. Deployment
Once configured, save and redeploy your application. The Cell loads automatically wherever you include the snippet. You can test the integration in **Preview Mode** to confirm that your Cell connects correctly and displays as expected.
#### Authentication Token
When embedding your Cell, ensure your **auth token (**`authToken`**) is valid and refreshed** at runtime. The embed script uses this token to authorize all Cell requests.
If your tokens expire (for example, short-lived JWTs), refresh them dynamically before initializing or reloading the Cell to avoid authentication failures.
**Example:**
```
"auth": {
"Authorization": ${authToken}
}
```
> **Tip:** If your application renews tokens automatically, reinitialize the `OpenSesameCellConfig` object or reload the widget after the new token is issued.
Your Cell is now live and fully embedded into your product. Once deployed, your users can interact with it immediately.
***
### 2. Manual Configuration
Manual configuration allows you to fine-tune how your Cell looks and behaves. You can adjust colour themes, layout, and size directly in the configuration object.
You can edit fields such as:
* `primaryColor`, `secondaryColor`, and `accentColor`
* `placeholderText` (for example “What can I do for you?”)
* `borderRadius`, `defaultWidth`, and `bottomMargin`
* `dictation`, `glowEnabled`, and `borderEnabled`
This gives you full control over the appearance and placement of your Cell within your application.
### 3. Additional Parameters — Simple Guide
#### What It Is
**Additional Parameters** let you automatically include required values—like customer IDs, company IDs, or region codes—in every API call your Cell makes. This ensures your Cell always operates in the correct data context without the user having to specify those details.
#### How It Works
You can define key-value pairs in the configuration UI or directly within your configuration object (for example, `customer_id: 12345`). These parameters are then automatically appended to all API calls your Cell makes to connected services.
#### Example
* **Without additional parameters:**\
The user must say, “Show me invoices for customer 12345.”
* **With additional parameters:**\
You define `customer_id: 12345` in your configuration. Now the user can simply say, “Show me my invoices,” and the Cell automatically includes the correct ID.
This approach is especially useful for maintaining the correct `userId`, `accountId`, or `companyId` context across all API interactions.
> **Note:** Additional Parameters are optional but recommended if your Cell connects to multi-tenant or user-specific APIs. It helps prevent context mismatches and reduces the need for repetitive user input.
***
### 4. Deployment
Once configured, save and redeploy your application. The Cell loads automatically wherever you include the snippet. You can test the integration in **Preview Mode** to confirm that your Cell connects correctly and displays as expected.
#### Authentication Token
When embedding your Cell, ensure your **auth token (**`authToken`**) is valid and refreshed** at runtime. The embed script uses this token to authorize all Cell requests.
If your tokens expire (for example, short-lived JWTs), refresh them dynamically before initializing or reloading the Cell to avoid authentication failures.
**Example:**
```
"auth": {
"Authorization": ${authToken}
}
```
> **Tip:** If your application renews tokens automatically, reinitialize the `OpenSesameCellConfig` object or reload the widget after the new token is issued.
Your Cell is now live and fully embedded into your product. Once deployed, your users can interact with it immediately.
***